13 Microwave Tricks That Actually Work (And Save You Time)
Your microwave does way more than just reheating leftovers. This humble kitchen appliance can be your secret weapon for quick cooking hacks that make meal prep faster and more efficient. I’ve tested dozens of microwave techniques over the years and narrowed down the 13 most reliable tricks that actually deliver results.
From perfectly melted butter without burning to quickly defrosting meat when you’re short on time, these microwave methods have become part of my daily cooking routine. The best part? They work consistently and save precious minutes in the kitchen without compromising on taste or quality.
Through simple adjustments in timing and technique, your microwave can bloom spices, dry fresh herbs, and even create crispy potato chips. These proven shortcuts help you work smarter in the kitchen while maintaining the integrity of your ingredients. Get ready to transform how you use your microwave with these time-saving tricks.
Melting Butter Perfectly
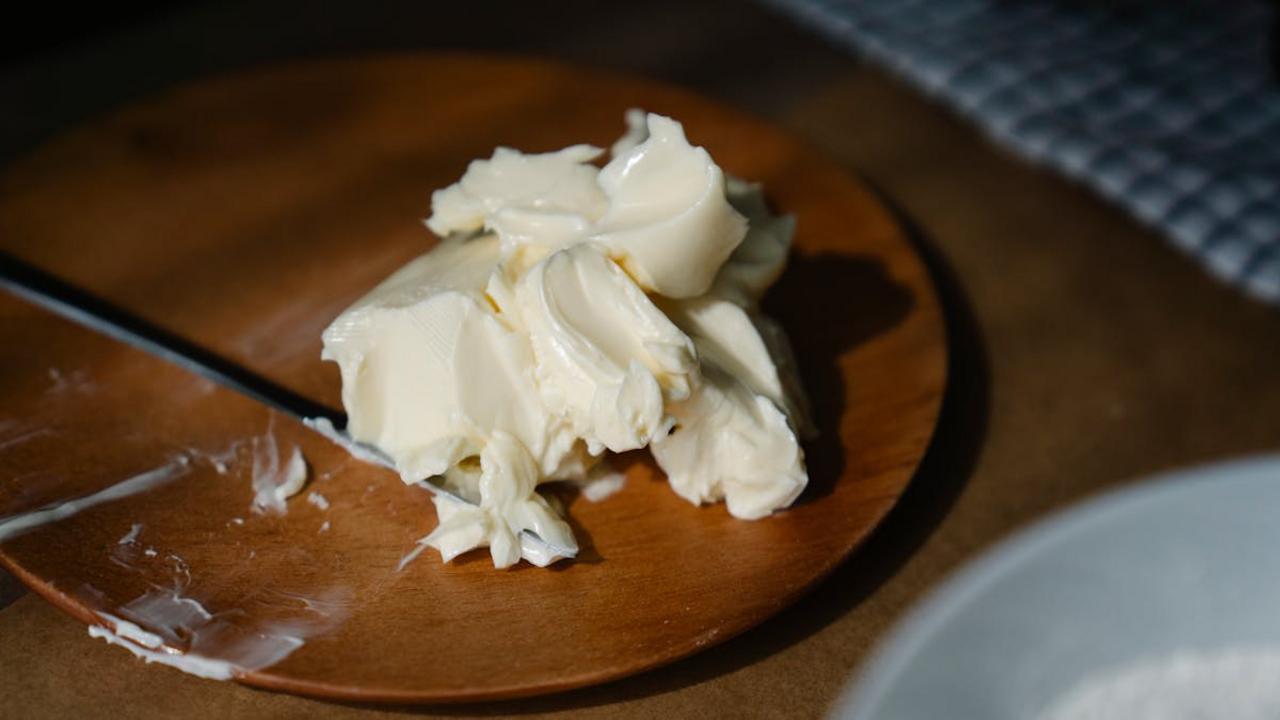
I’ve discovered the perfect technique for melting butter in the microwave without making a mess or having it explode all over! The key is to cut your cold butter into small, even cubes (about 1-inch pieces) and place them in a microwave-safe bowl. Then, microwave at 50% power in 10-second intervals, stirring between each interval. This method gives you complete control over the melting process and prevents those frustrating butter explosions that leave your microwave looking like a crime scene.
For recipes that need melted butter at room temperature, I recommend covering your bowl with a paper towel to catch any splatters and stopping the microwave just before the butter completely melts. The residual heat will finish the job, leaving you with perfectly melted butter that’s ready to use in your baking. This method works especially well when you need melted butter for cakes, cookies, or even your morning toast. Plus, if you need browned butter, you can continue microwaving in short bursts until you see a golden color and smell that nutty aroma.
Defrosting Frozen Meat Quickly
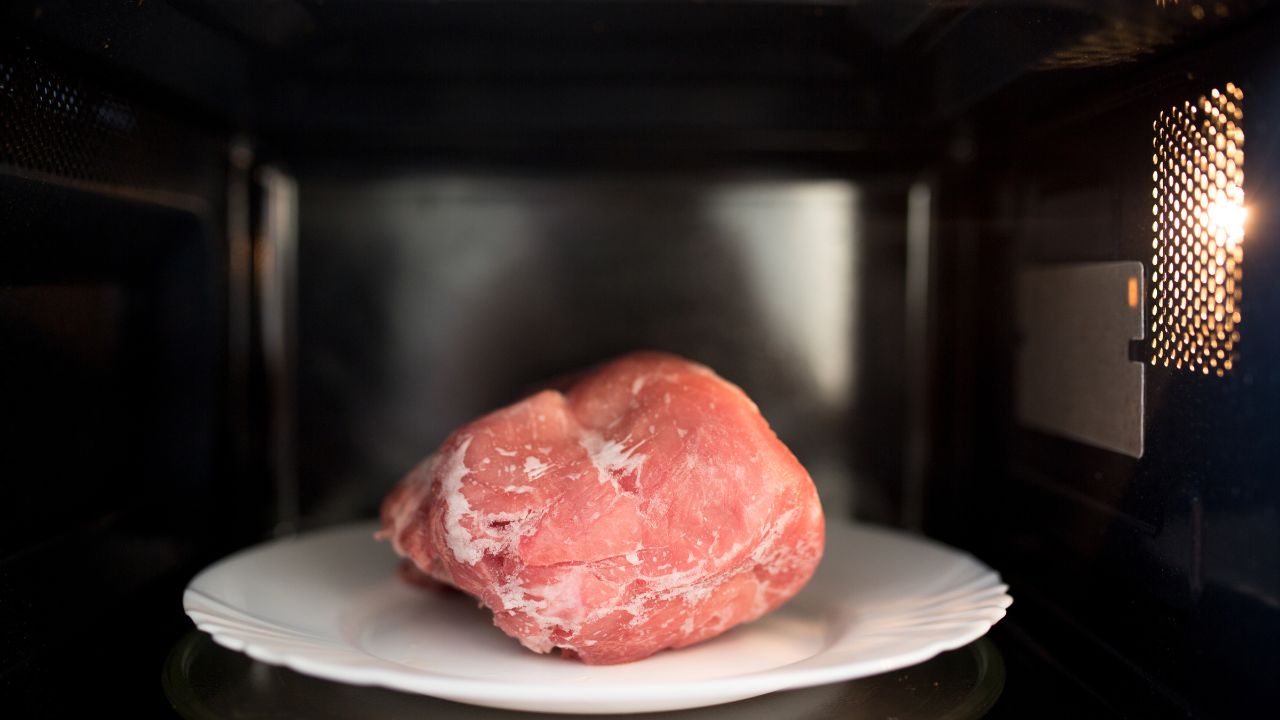
Need to thaw frozen meat fast? Your microwave can be your best friend in a pinch! I’ve learned through years of cooking that using the defrost setting (or 30% power) works wonders. Place your meat on a microwave-safe plate, removing any packaging first. Run the defrost cycle for about 3-4 minutes per pound, making sure to rotate and flip the meat every minute. The key is keeping an eye on the edges – you want them slightly warm but not cooking while the center continues to thaw.
One trick I always recommend: add a microwave-safe bowl filled with water alongside your meat while defrosting. The extra moisture helps prevent dry spots and promotes more even thawing. Remember to cook your meat immediately after microwave defrosting since some areas might start cooking during the process. If you notice any gray or slightly cooked patches, that’s okay – just make sure to check the internal temperature once fully cooked. For best results with ground meat, break apart the thawed portions every minute to speed up the process.
Cooking Scrambled Eggs

Want to make fluffy scrambled eggs in the microwave? Mix 2-3 eggs with a splash of milk or cream, salt, and pepper in a microwave-safe bowl. The key lies in cooking them in 30-second intervals, stirring between each round. You’ll notice the edges start to set first – just pull them toward the center with your fork while the middle stays soft. This method takes about 1.5-2 minutes total, depending on how many eggs you’re cooking. Add a pat of butter at the beginning for extra richness and to prevent sticking.
I’ve found the microwave method particularly useful during busy mornings or when I’m cooking for one. The eggs turn out just as good as stovetop versions, with minimal cleanup needed. Remember to use a bowl that’s about twice the size of your raw egg mixture since they expand while cooking. For extra flavor, try mixing in shredded cheese, fresh herbs, or diced vegetables right before the final cooking interval. The residual heat will melt the cheese and warm the add-ins perfectly, creating a quick and satisfying breakfast in minutes.
Steaming Vegetables
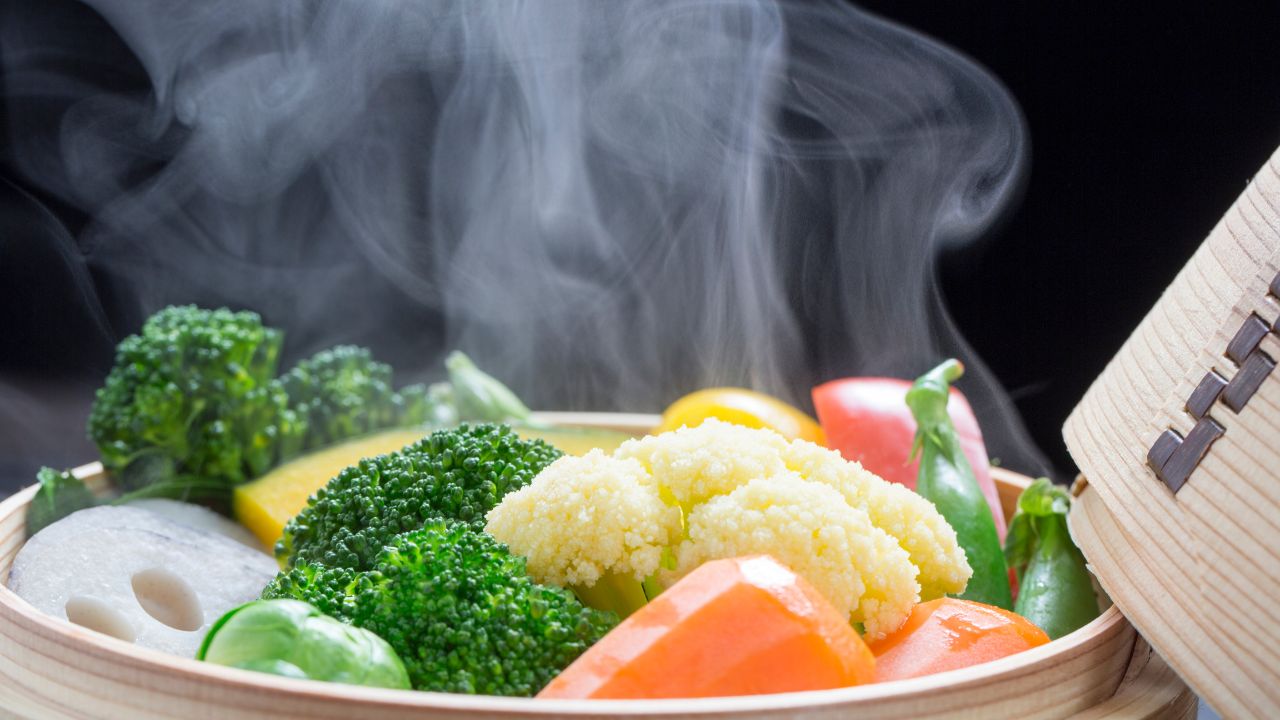
I’ve discovered the perfect microwave hack for steaming vegetables that gives you tender-crisp results in minutes. Just place your chopped veggies in a microwave-safe bowl with 2-3 tablespoons of water, cover with a plate or microwave-safe lid (leaving a small gap for steam to escape), and cook in 1-minute intervals. Your broccoli, carrots, or green beans will turn bright and beautiful while keeping their nutrients intact. The quick bursts of cooking help maintain the vegetables’ natural texture without turning them mushy.
The key to perfect microwave-steamed vegetables lies in cutting them into similar-sized pieces for even cooking. For dense vegetables like carrots or potatoes, you’ll need 3-4 minutes total, while softer ones like zucchini or asparagus only need 1-2 minutes. I recommend checking doneness by poking with a fork – you want the vegetables tender enough to pierce but still firm enough to hold their shape. Remember to drain any excess water immediately after cooking to prevent overcooking from residual heat. This method saves time and energy compared to stovetop steaming while delivering consistently good results.
Softening Brown Sugar
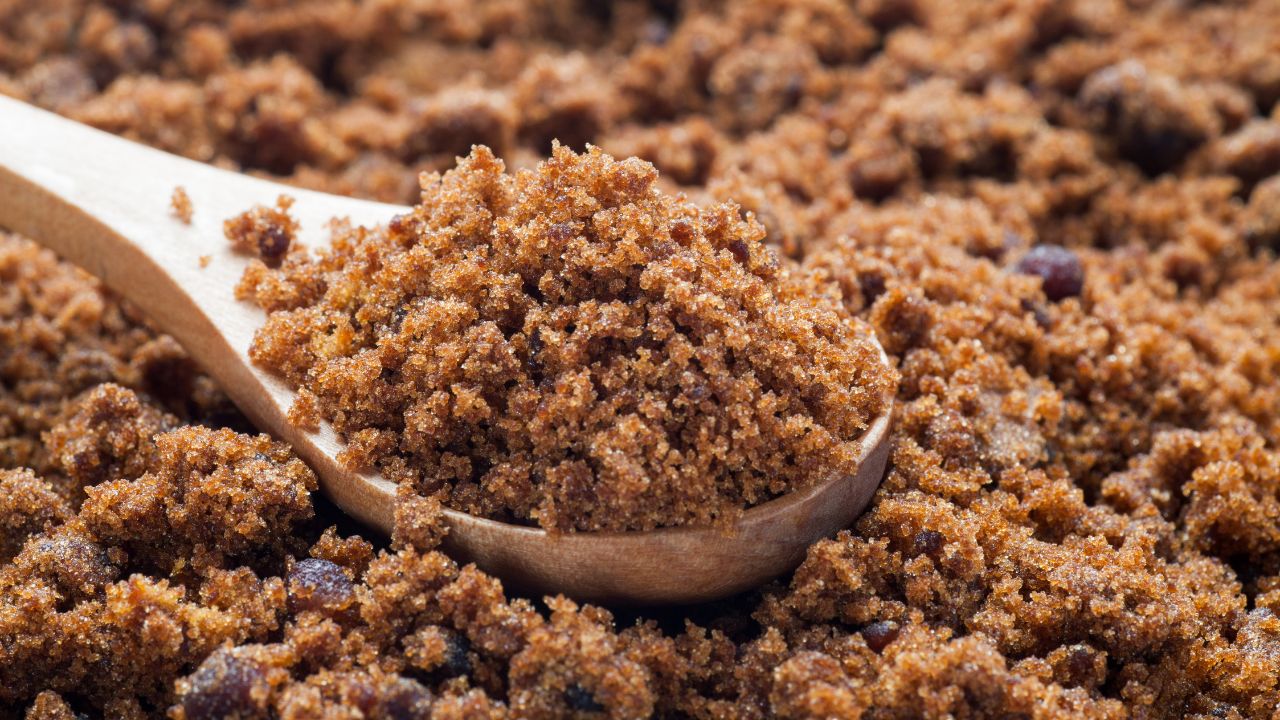
I can’t count how many times I’ve reached for my brown sugar only to find it rock-hard! The microwave can save your baking plans in minutes. Put your hardened brown sugar in a microwave-safe bowl and place a damp paper towel over the top. Microwave in 20-second intervals, checking and breaking up any clumps with a fork between each round. You’ll need about 1-2 minutes total, depending on how much sugar you’re softening. The moisture from the paper towel helps rehydrate the sugar crystals, making them soft and scoopable again.
Here’s a pro tip from my kitchen: keep a small clay disk or apple slice in your brown sugar container to maintain moisture and prevent hardening in the first place. But when you forget (like I often do), the microwave method works perfectly. Just remember not to overheat the sugar – it can start to melt if you go too far. Once softened, transfer your brown sugar to an airtight container right away. If you spot any lumps, break them up while the sugar’s still warm. This trick has saved countless batches of cookies and morning oatmeal bowls in my kitchen!
Making Potato Chips

I’ve discovered that making crispy potato chips in the microwave is not only quick but gives you total control over the seasonings. You’ll need to slice your potatoes paper-thin (a mandoline works best here), then arrange them in a single layer on a microwave-safe plate lined with parchment paper. Give them a light coating of olive oil and your choice of seasonings – I love mixing paprika, garlic powder, and a pinch of black pepper. Microwave in 30-second intervals, checking between each round until they turn golden brown and crisp up.
The key to perfect microwave potato chips lies in the preparation and timing. Make sure to pat the potato slices completely dry with paper towels before seasoning – any excess moisture will make them steam instead of crisp. Watch them closely during microwaving since they can go from perfect to burnt in seconds. Once done, let them cool for about a minute to reach maximum crispiness. You can store them in an airtight container, but honestly, they’re so good they rarely last more than a few minutes in my kitchen. This method gives you fresh, preservative-free chips in under 5 minutes.
Reviving Stale Bread

Got a loaf of bread that’s gone stale and hard? Your microwave can bring it back to life in just 30 seconds! Start by wrapping your bread in a slightly damp paper towel – make sure it’s not too wet or you’ll end up with a soggy mess. Place the wrapped bread on a microwave-safe plate and heat it in 10-second intervals. The moisture from the paper towel will steam the bread, making it soft and fresh-tasting again. This quick fix works perfectly for bread rolls, baguettes, and even regular sandwich slices.
I’ve found this trick particularly helpful when I need to serve bread at dinner but forgot to buy a fresh loaf. The key lies in not overdoing the dampness of the paper towel – you want it just moist enough to create light steam. Remember to eat the bread right away while it’s warm and soft. If you leave it to cool, it will become hard again. For best results, only revive the amount of bread you plan to eat immediately. This method gives you warm, soft bread in seconds without turning on the oven or waiting for a full defrost cycle.
Creating Quick Mug Cakes

I’ve made countless mug cakes in my microwave, and through much trial and error, I’ve found the perfect formula for a quick treat that takes just 2 minutes to make. Mix 4 tablespoons of all-purpose flour, 4 tablespoons of sugar, 1 egg, 3 tablespoons of milk, 3 tablespoons of oil, and 1/2 teaspoon of baking powder in a microwave-safe mug. Add a splash of vanilla extract and a pinch of salt to bring out the sweetness. For chocolate versions, add 2 tablespoons of cocoa powder – trust me, it makes all the difference.
The key to a perfect mug cake lies in the microwaving technique. Start with 60 seconds at full power, then check the consistency. If it needs more time, continue in 10-second bursts until the cake springs back when touched. Don’t overcook it, or you’ll end up with a rubbery texture. Get creative with mix-ins like chocolate chips, nuts, or fruit – just sprinkle them on top before cooking. I often make these late at night when I want something sweet but don’t want to deal with a full baking production. The best part? You’ll only have one mug to wash afterward!
Cooking Corn on the Cob
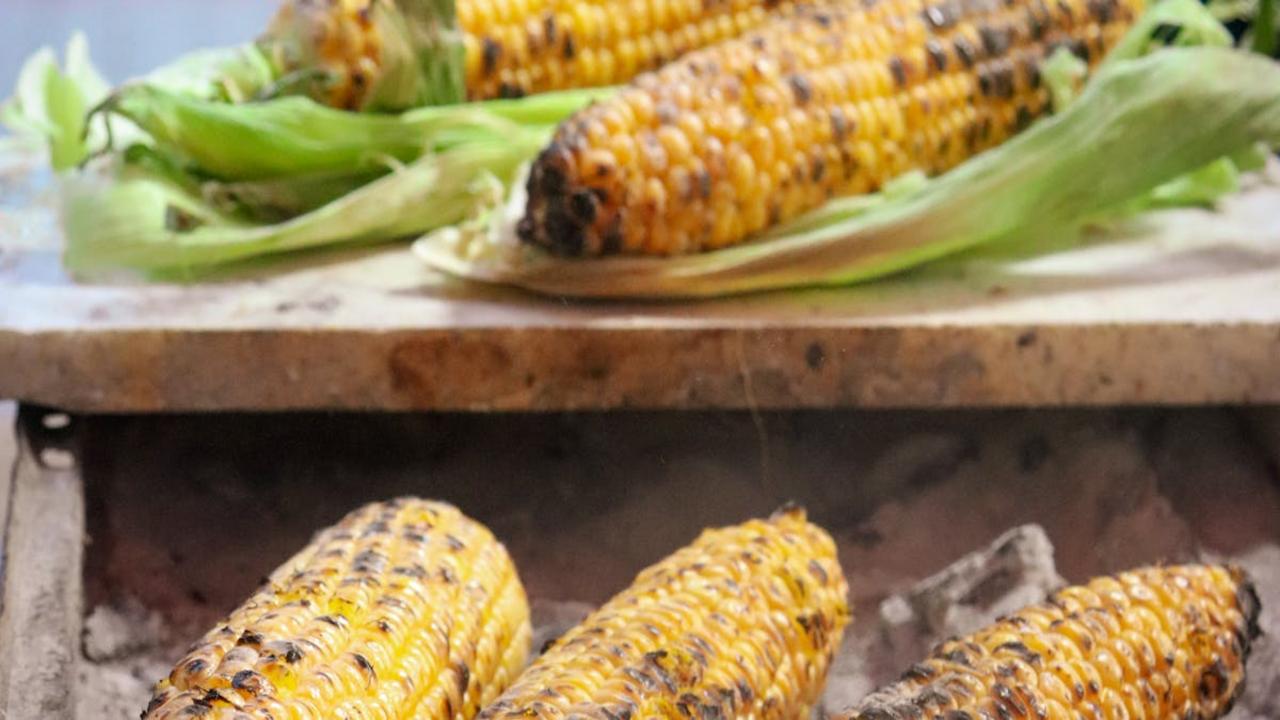
Your microwave can turn fresh corn on the cob into a sweet, tender summer treat in just minutes – no pot of boiling water needed! I love this quick method: Leave the husks on, put the corn in the microwave, and cook for about 4 minutes per ear. The natural moisture inside the husks creates a perfect steaming environment that brings out the corn’s natural sweetness while keeping the kernels juicy and crisp. Once done, carefully remove the hot corn and peel back the husks and silk (they’ll slide right off). Add butter, salt, and any seasonings you want.
This microwave trick saves me so much time during busy weeknight dinners or backyard gatherings. The corn cooks evenly from end to end, unlike stovetop methods that can leave some spots overcooked. I’ve found this technique works great whether you’re cooking one ear or four – just add 4 minutes per ear. Your corn will stay hot longer too since the husks act like a natural insulator. Plus, cleanup is minimal – no big pot to wash! The microwave keeps all the heat contained, making this perfect for hot summer days when you don’t want to steam up your kitchen.
Toasting Nuts
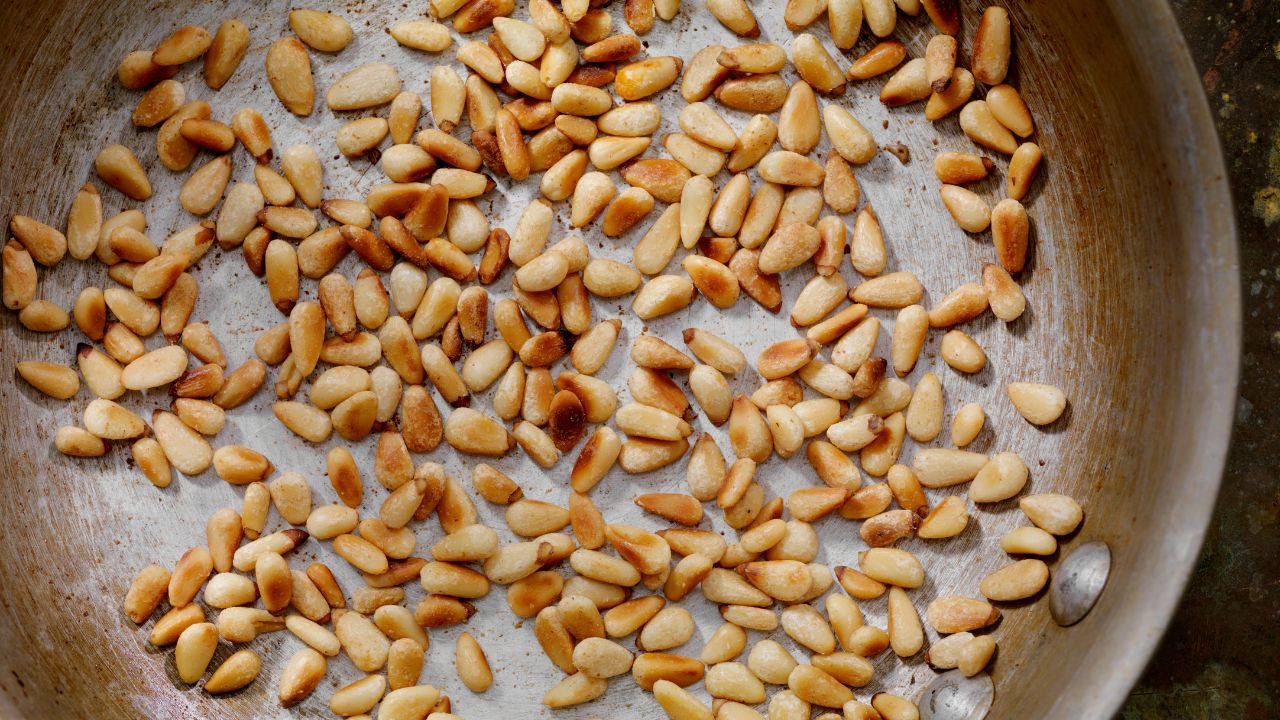
Want to bring out the rich, deep flavors of nuts without heating up your whole kitchen? Your microwave can toast nuts quickly and evenly in just a few minutes. I’ve found microwaving nuts works better than stovetop methods since you won’t risk burning them. Simply spread your raw nuts in a single layer on a microwave-safe plate and heat them in 30-second intervals, stirring between each round. Keep going until they turn golden brown and release their oils, which usually takes 2-3 minutes total.
A quick tip I learned from my grandmother – add a tiny pinch of salt before microwaving to enhance the natural nuttiness. The dry heat from microwaving makes nuts extra crunchy and intensifies their natural oils and flavors. This method works great for almonds, pecans, walnuts, and pine nuts. Just remember nuts can go from perfectly toasted to burnt quickly, so watch them closely. The bonus? Your kitchen won’t get hot and you’ll save significant time compared to oven-toasting. I now keep a jar of microwave-toasted nuts ready for salads, baking, and snacking.
Poaching Eggs

You might think poaching eggs requires fancy equipment or advanced cooking skills, but your microwave can help you make perfect poached eggs in minutes! Fill a microwave-safe bowl with 1/2 cup water and a splash of white vinegar. Crack a fresh egg into the bowl, making sure it’s completely submerged. Cover the bowl with a microwave-safe plate and cook on medium power for about 1 minute. Keep an eye on it since microwaves vary – you want the white set but the yolk still runny.
I’ve found this method incredibly reliable for quick breakfasts, especially on busy mornings. The vinegar helps keep the egg white together, preventing it from spreading too much while cooking. If you like your yolk more firm, add 10-15 seconds to the cooking time. Once done, remove the egg with a slotted spoon and place it on a paper towel to drain excess water. Top your avocado toast, grain bowls, or salads with these perfectly poached eggs for an extra protein boost that looks and tastes like it came from a professional kitchen.
Blooming Spices

You might think microwaving spices would ruin their flavor, but I’ve discovered quite the opposite! Just like how restaurants heat dried spices in a pan to release their oils and intensify their aroma, your microwave can do the same job in seconds. I learned this trick while making Indian curry one day – pop your whole spices like cumin seeds, coriander seeds, or cardamom pods on a microwave-safe plate and heat them for 15-20 seconds. Watch them closely through the microwave door to prevent burning. The heat kicks up their natural oils and makes your dishes much more flavorful.
This quick method works particularly well if you’re short on time or don’t want to dirty another pan. The microwave heat draws out the natural compounds in spices that give them their distinct flavors – think of the warm, nutty notes in cumin or the bright, citrusy hints in coriander. I now do this regularly with my morning chai spice blend, and the difference in flavor is remarkable. Just remember to let the spices cool for a minute before grinding them or adding them to your dish. Your nose will tell you when they’re ready – the kitchen will fill with their beautiful fragrance!
Drying Fresh Herbs

Did you know your microwave can dry fresh herbs in just a few minutes? I’ve found this trick saves me so much money compared to buying dried herbs at the store. Simply wash your herbs, pat them completely dry with paper towels, then lay them in a single layer between two paper towels on a microwave-safe plate. Microwave in 30-second bursts, checking after each interval – most herbs need about 2-3 minutes total. You’ll know they’re done when they feel crispy and break easily.
The key to perfect microwave-dried herbs lies in watching them closely to prevent burning. I dry everything from oregano and thyme to sage and rosemary this way. Once dried, crumble the herbs into an airtight container and store in a cool, dark place. Your homemade dried herbs will keep their flavor for up to 6 months, much longer than fresh ones in the fridge. Plus, you’ll notice they pack more punch than store-bought versions since you’ve dried them at peak freshness. This method works great when my garden gives me more herbs than I can use fresh.